> ## Documentation Index
> Fetch the complete documentation index at: https://wisty.ai/docs/llms.txt
> Use this file to discover all available pages before exploring further.
# Update Salesforce records
> Enable record changes, review approvals, and manage auto-approved writes.
export const ExamplePrompt = ({text}) => {text};
Open your project's **Settings** and enable **Create & edit records** to let the app create or update Salesforce records. Click **Save changes**, then test the feature in the preview.
Record changes are off by default. Once enabled, the person using the app approves each change unless they've turned on auto-approval for that operation.
Preview writes change real records in the connected Salesforce org. Use a
sandbox or suitable test records when trying a new write feature. The builder
preview asks for approval every time.
## Enable the action you need
Open **Settings** in the project.
Turn on **Create & edit records** for forms or record updates. Turn on **Delete records** only if the app needs to delete records. These are separate controls.
Click **Save changes**, then ask Wisty for the record action. For example:
Wisty can also ask you to enable the required access through an **Allow access** card in chat.
In **Preview**, use the new form or action on an appropriate test record. Review the proposed change in the approval dialog before confirming.
Check the record in Salesforce afterward to confirm the intended result.
[Publish the app or publish changes](/docs/publishing/publish) after testing. The published version includes the access settings you saved.
If you enable writes after an app is already published, you need to publish again before viewers can use them.
```mermaid actions={false} theme={null}
---
config:
theme: base
themeVariables:
fontFamily: inherit
fontSize: 15px
lineColor: "#8C817A"
edgeLabelBackground: "#FFFFFF"
flowchart:
nodeSpacing: 24
rankSpacing: 32
padding: 12
curve: basis
---
flowchart TB
accTitle: How a record change is approved and run
accDescr: The app proposes a change. Unless the viewer has auto-approved that operation, an approval dialog shows the fields and values. Cancel runs nothing. An approved change is sent by Wisty as the current Salesforce user, and Salesforce applies its permissions, validation rules, and automation. The outcome appears under Writes in Network.
F["App proposes a change"]:::input
D{"Auto-approved for
this operation?"}:::input
Q["Approval dialog
Review fields and values"]:::process
N["Nothing runs"]:::blocked
W("Wisty sends the request
as the current user"):::app
S[("Salesforce
Permissions, validation, automation")]:::data
O["Outcome logged
Network, then Writes"]:::input
F --> D
D -->|No| Q
D -->|Yes| W
Q -->|Cancel| N
Q -->|Approve| W
W --> S
S --> O
classDef input fill:#F5F3F0,stroke:#D6CFC8,color:#51463F,stroke-width:1px;
classDef process fill:#FFF1E8,stroke:#D94400,color:#8A2C0D,stroke-width:1.5px;
classDef app fill:#FFF1E8,stroke:#D94400,color:#8A2C0D,stroke-width:2px;
classDef data fill:#EFF6F1,stroke:#8AA995,color:#315640,stroke-width:1px;
classDef blocked fill:#FFFFFF,stroke:#B9ADA3,color:#8C817A,stroke-width:1px,stroke-dasharray:4 3;
linkStyle default stroke:#8C817A,stroke-width:1.5px;
```
## Review a proposed change
The approval dialog names the action, object, and number of records. For creates and updates, review the fields and proposed values. For a batch, step through its records before approving.
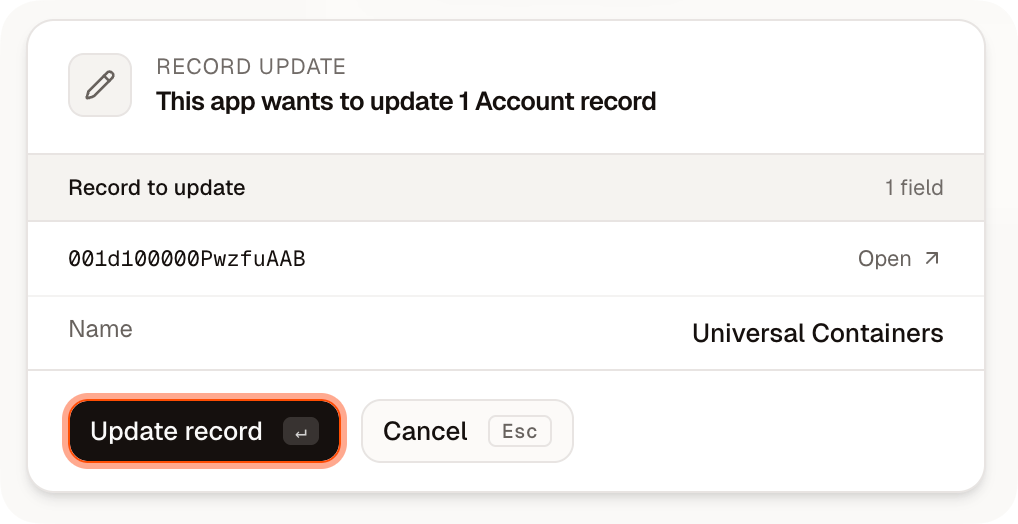 Updates and deletes include links to the records in Salesforce. Use them when you need more context.
Click **Create record**, **Update record**, or **Delete record** to run the displayed request once. For a batch, the button names the count, such as **Update 3 records**. **Cancel** runs nothing. Delete approvals put the initial focus on **Cancel**.
Each request can change up to 200 records. A batch is all-or-nothing: if Salesforce rejects one record, none of that batch is committed. A feature that submits several batches can have a different result for each batch.
## Choose whether to be asked again
On a published app, open the menu beside the approval button to choose an option such as **Update and don't ask again**.
That choice applies to the operation, not just the displayed record or object. For example, auto-approving updates allows later updates in that app and org without another prompt, within your Salesforce permissions.
Creates, updates, and deletes have separate auto-approval choices. Each viewer controls their own choices. Publishing a new version requires viewers to approve again.
### Turn off auto-approval
1. Open the published app's **Settings** gear in its dock.
2. Find the operation under **Auto-approved writes**.
3. Click **Turn off**.
The next change for that operation asks for approval again. For an app embedded on a Salesforce page, use the gear in the corner of the app.
## Check the outcome
In the project, open **Network** and find **Writes** below the request list. It shows activity across the app's viewers: the operation, objects, record counts, and outcome. It doesn't show record values.
If an entry says **Outcome unknown**, check Salesforce before trying the
action again. Wisty didn't receive a conclusive result; the change may have
happened. Wisty doesn't automatically retry a write.
When Salesforce rejects a change, check the reported reason. Required fields, validation rules, and the viewer's permissions can prevent a write. Existing Salesforce automation still runs when records change.
## Whose permissions apply
The write runs through the Salesforce connection of the person using the app. Salesforce object permissions, field permissions, and record access still apply. Two people can get different results from the same action because they have different access.
Record values pass through Wisty to execute the write and aren't stored in its write-activity log. The log contains metadata about the attempt. For value-level history, use your org's Salesforce audit configuration. See [How Wisty uses your data](/docs/security/data-handling).
Updates and deletes include links to the records in Salesforce. Use them when you need more context.
Click **Create record**, **Update record**, or **Delete record** to run the displayed request once. For a batch, the button names the count, such as **Update 3 records**. **Cancel** runs nothing. Delete approvals put the initial focus on **Cancel**.
Each request can change up to 200 records. A batch is all-or-nothing: if Salesforce rejects one record, none of that batch is committed. A feature that submits several batches can have a different result for each batch.
## Choose whether to be asked again
On a published app, open the menu beside the approval button to choose an option such as **Update and don't ask again**.
That choice applies to the operation, not just the displayed record or object. For example, auto-approving updates allows later updates in that app and org without another prompt, within your Salesforce permissions.
Creates, updates, and deletes have separate auto-approval choices. Each viewer controls their own choices. Publishing a new version requires viewers to approve again.
### Turn off auto-approval
1. Open the published app's **Settings** gear in its dock.
2. Find the operation under **Auto-approved writes**.
3. Click **Turn off**.
The next change for that operation asks for approval again. For an app embedded on a Salesforce page, use the gear in the corner of the app.
## Check the outcome
In the project, open **Network** and find **Writes** below the request list. It shows activity across the app's viewers: the operation, objects, record counts, and outcome. It doesn't show record values.
If an entry says **Outcome unknown**, check Salesforce before trying the
action again. Wisty didn't receive a conclusive result; the change may have
happened. Wisty doesn't automatically retry a write.
When Salesforce rejects a change, check the reported reason. Required fields, validation rules, and the viewer's permissions can prevent a write. Existing Salesforce automation still runs when records change.
## Whose permissions apply
The write runs through the Salesforce connection of the person using the app. Salesforce object permissions, field permissions, and record access still apply. Two people can get different results from the same action because they have different access.
Record values pass through Wisty to execute the write and aren't stored in its write-activity log. The log contains metadata about the attempt. For value-level history, use your org's Salesforce audit configuration. See [How Wisty uses your data](/docs/security/data-handling).