> ## Documentation Index
> Fetch the complete documentation index at: https://wisty.ai/docs/llms.txt
> Use this file to discover all available pages before exploring further.
# Publish and update an app
> Put a tested version in front of viewers, publish changes, or take it offline.
Click **Publish** in your project to make a [version](/docs/getting-started/key-concepts#version) available as an [app](/docs/getting-started/key-concepts#app). Later edits stay in the project until you publish again.
```mermaid actions={false} theme={null}
---
config:
theme: base
themeVariables:
fontFamily: inherit
fontSize: 15px
lineColor: "#8C817A"
edgeLabelBackground: "#FFFFFF"
flowchart:
nodeSpacing: 24
rankSpacing: 32
padding: 12
curve: basis
---
flowchart TB
accTitle: From a working project to a live app
accDescr: Publishing makes a version of your working project available as the live app. Viewers open that published version. Later edits stay in the project until you publish again.
P["Project
Working version"]:::input
A("Published app
Live version"):::app
V["Viewers"]:::input
P -->|Publish| A
A -->|Open or reload| V
classDef input fill:#F5F3F0,stroke:#D6CFC8,color:#51463F,stroke-width:1px;
classDef app fill:#FFF1E8,stroke:#D94400,color:#8A2C0D,stroke-width:2px;
linkStyle default stroke:#8C817A,stroke-width:1.5px;
```
## Publish for the first time
Build and test the project in the preview first. If you build inside Salesforce, you need the [builder permission](/docs/salesforce-setup/control-access).
1. Click **Publish** at the top of the project.
2. Open **Sharing** to choose who can open the app, then click **Save**. Leave it private if you're testing it yourself. [Share and open apps](/docs/publishing/share-apps) explains each audience.
3. Review **Salesforce access**. Click the row to open the project's **Settings** if you need to change it. Click **Save changes**, then open **Publish** again.
4. Click **Publish app** and wait for publishing to finish.
5. Click **View App** to open the published result.
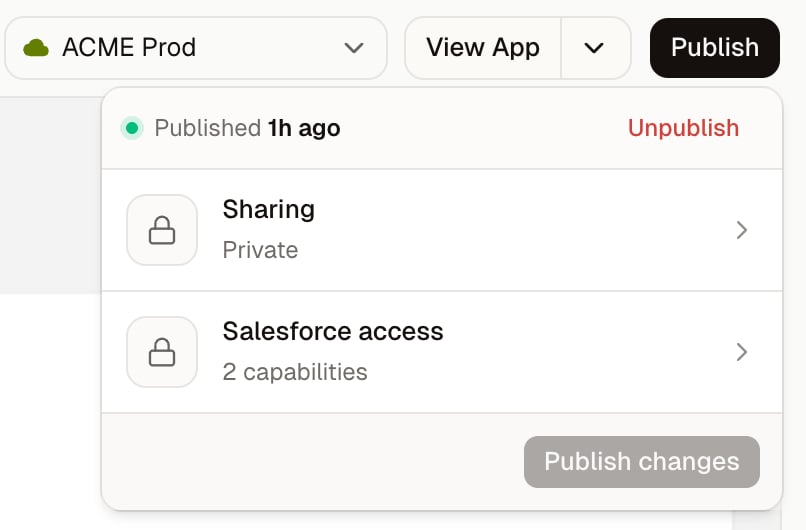 The project status now reads **Live**. The app uses each viewer's Salesforce permissions, so test with someone from the intended audience before relying on your own result.
**Make a change to publish** means the project doesn't have a generated app
yet. Return to chat and describe what you want to build.
## What gets published
[Publishing](/docs/getting-started/key-concepts#publish) saves a fixed build of the project's code and its Salesforce access settings. Only one published version is live at a time.
The app can't request access beyond those saved settings. Record writes are off by default. When enabled, viewers approve writes unless they've chosen to auto-approve that operation. See [Update Salesforce records](/docs/building/record-writes).
Your Salesforce credentials aren't included in the build. Viewers use their own Salesforce login, and live records can change after you publish. The app's code stays fixed until you publish another version.
## Publish changes
1. Make and test your changes in the project.
2. Click **Publish**. The project shows **Live · unpublished changes** when it differs from the live app.
3. Review the Salesforce access settings, then click **Publish changes**.
Viewers get the new version when they next open or reload the app. An older version already open in a tab can no longer fetch Salesforce data after it's replaced; reload that tab to use the new version.
If **Publish changes** is disabled, there are no changes to publish. Edits and saved Salesforce access changes both count. Changing who can open the app applies separately, without republishing.
## Publish an older version
Use history when you want viewers to return to an earlier build.
1. Click **Show history** next to chat.
2. Find the version you want. **PUBLISHED** marks the live version; **CURRENT** marks your working version.
3. Hover over the older version and click **Publish**.
Publishing an older version changes the live app without replacing your working version. It uses your current sharing settings. Review Salesforce access before publishing; don't assume selecting older code restores older access settings.
To continue editing from that version instead, click **Restore**. Restoring changes your working project; publish afterward when you're ready for viewers to use it. See [Work on a project](/docs/building/projects).
## Take an app offline
1. Open the project and click **Publish**.
2. Click **Unpublish** at the top of the popover.
New launches stop, and already-open copies can no longer make Salesforce requests. Your project, history, and sharing settings remain, so you can publish again later.
To keep the app live while removing an audience, change [Sharing](/docs/publishing/share-apps#change-who-can-open-an-app) instead. For an app placed on a Salesforce page, its [Embed ID](/docs/publishing/embed-in-salesforce) stays the same when you publish updates.
The project status now reads **Live**. The app uses each viewer's Salesforce permissions, so test with someone from the intended audience before relying on your own result.
**Make a change to publish** means the project doesn't have a generated app
yet. Return to chat and describe what you want to build.
## What gets published
[Publishing](/docs/getting-started/key-concepts#publish) saves a fixed build of the project's code and its Salesforce access settings. Only one published version is live at a time.
The app can't request access beyond those saved settings. Record writes are off by default. When enabled, viewers approve writes unless they've chosen to auto-approve that operation. See [Update Salesforce records](/docs/building/record-writes).
Your Salesforce credentials aren't included in the build. Viewers use their own Salesforce login, and live records can change after you publish. The app's code stays fixed until you publish another version.
## Publish changes
1. Make and test your changes in the project.
2. Click **Publish**. The project shows **Live · unpublished changes** when it differs from the live app.
3. Review the Salesforce access settings, then click **Publish changes**.
Viewers get the new version when they next open or reload the app. An older version already open in a tab can no longer fetch Salesforce data after it's replaced; reload that tab to use the new version.
If **Publish changes** is disabled, there are no changes to publish. Edits and saved Salesforce access changes both count. Changing who can open the app applies separately, without republishing.
## Publish an older version
Use history when you want viewers to return to an earlier build.
1. Click **Show history** next to chat.
2. Find the version you want. **PUBLISHED** marks the live version; **CURRENT** marks your working version.
3. Hover over the older version and click **Publish**.
Publishing an older version changes the live app without replacing your working version. It uses your current sharing settings. Review Salesforce access before publishing; don't assume selecting older code restores older access settings.
To continue editing from that version instead, click **Restore**. Restoring changes your working project; publish afterward when you're ready for viewers to use it. See [Work on a project](/docs/building/projects).
## Take an app offline
1. Open the project and click **Publish**.
2. Click **Unpublish** at the top of the popover.
New launches stop, and already-open copies can no longer make Salesforce requests. Your project, history, and sharing settings remain, so you can publish again later.
To keep the app live while removing an audience, change [Sharing](/docs/publishing/share-apps#change-who-can-open-an-app) instead. For an app placed on a Salesforce page, its [Embed ID](/docs/publishing/embed-in-salesforce) stays the same when you publish updates.